What is a Kit Car?

Quartermile:
Kit Cars – What are they?
Think of a Lego set, but for a car!
Why kit cars?
They are a car focused on performance or style. Imagine a Ferrari or Shelby Cobra for the price of a new Ford Focus!

Lets put it together!

I’ve written a few articles about buying cheaper used supercars or

newer muscle cars and I’ve told you about a few different styles of cars such as  street rods and muscle cars. But buying a car assembled by a major manufacture isn’t the only way to get a car. If you are the handy type or just want to break the mold, you can build a car yourself! Of course, building a car by yourself, from nothing is a pretty difficult task, and that’s not what I’m proposing, although that has been done also! Check it out here. If you’re not as hard-core as Ken, but still want something different you are in luck! You can build a kit car!

So what is a kit car? A kit car is a car that you purchase in pieces and assemble yourself, it’s basically like a Lego set, or buying a table from IKEA. Why would anyone want to do this you might ask? Well there are a few reasons.

1. You can get a kit car that looks and performs like a much more expensive car than it is.
2. You can build a car that never existed.
3. You can build a car that did exist but is way too rare to buy an original. (Think Shelby Cobra).

Why would a company want to design a kit car instead of a production car? There are a few reasons for that also!

1. It is (much much) cheaper for a company to design and sell a kit can than it is for Ford, or other major manufacturers. Often kit cars source a reliable engine from the major manufacturers. The body and suspension are the major contributions by the designers.

2. This is because a kit car doesn’t have to pass all the safety standards a new car does. They also aren’t held to the same standards for NVH and other considerations. That being said, that doesn’t mean that they are (all) unsafe, or harsh. Many companies put a lot of work into the kits to make them great cars.

Let’s look at the different types of kit cars available.

The first are replicas of current or older cars that you can build yourself. One example of this is the Factory Five Roadster . It is basically a recreation of a Shelby Cobra from the 1960’s. Why not just buy an original Cobra you ask?


Check Hemmings Motor news http://www.hemmings.com/ . An original Shelby Cobra is rare, and therefore expensive (think $100k+) where as a Factory Five Roadster can be assembled for $30k if you do it the right way. You also have the benefit of putting a variety of engines and upgrades suspension, electronics and just about everything else that has progressed in the automotive world in the last 50 years.

Another that is one of my favorites is a Chevrolet Cheetah kit car. What is a Chevrolet Cheetah you ask? It was a car made to beat the Shelby Cobra in it’s day. Unfortunately tragedy befell the company and only 19 (or so) were ever made. The good news is you can buy the beautiful Cheetah as a kit and put it together yourself!
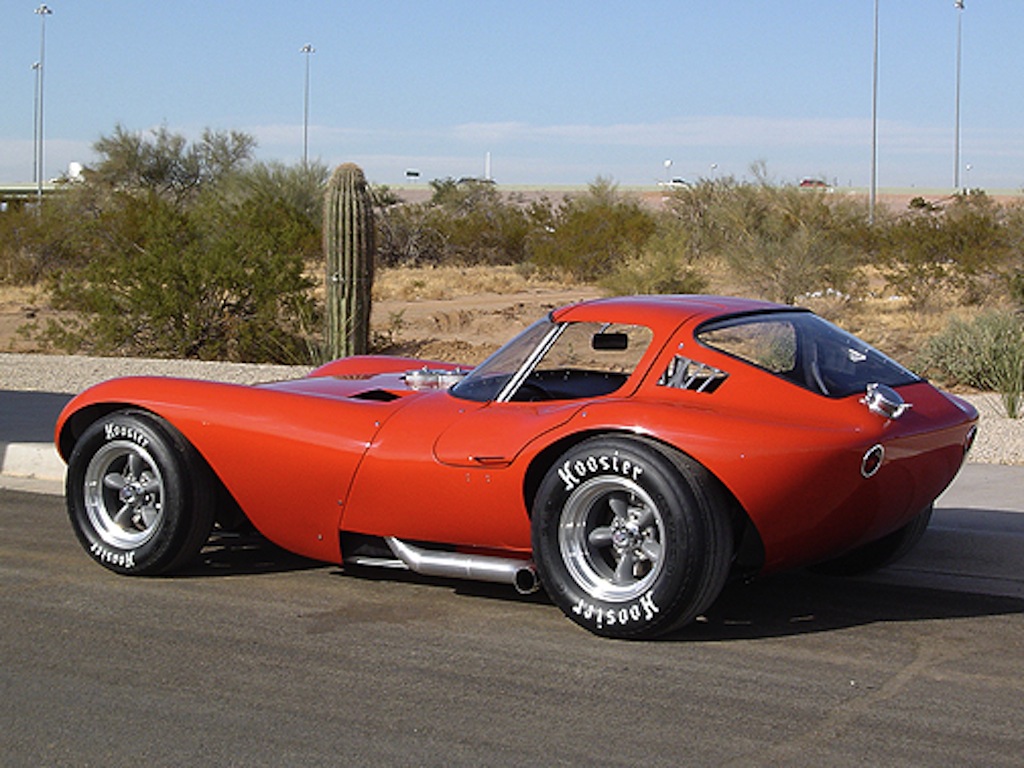
Lamborghini’s and Ferrari’s are other vehicles that are popular in this type of “build cheaper than you can buy” category.

gtm

The second type of kit car is a car that never was made. Factory Five has one of these available also. Is called the Factory Five GTM supercar. It’s a “generic” supercar being that it is low, wide and good looking. That being said, it is also a lot more ‘’cost effective” than a Ferrari or Lambo, and if you were to damage it, you know you could always rebuild it!  Here are 2 other supercar kits. The Superlite (at beginning of article) is the first, and here’s a quote from their site

“Q. How easy is it to build, really? –
A. The Superlite SLC was designed to be built in your garage, using basic hand tools.  You don’t need to do any welding, or machining, or have fancy tools.”
Sounds pretty great to me!

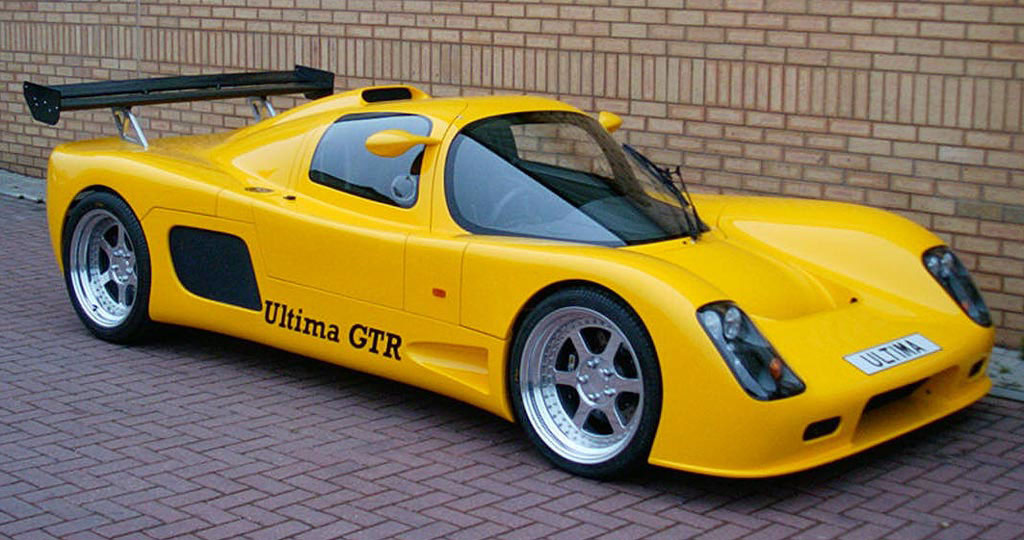
And here’s another supercar/racecar kit, the Ultima GTR, made in England.

And here’s a final one, the K1 Attack, made in the Czech Republic.
06_K1-Attack_racing
There is also a third type of kit car. It’s not a complete kit like the cars talked about before, but it’s a massive redesign of an existing car but also bought in kit form. Pontiac Fieros are popular cars for this as they were rear engine like many supercars. Often they get made into Lamborghini’s.

There is also this car, build from a 1990’s Ford Thunderbird.

So as you can see the kit car industry is far reaching, covering many different styles of cars. They are actually relatively affordable, if you are in the market for a performance car. There are often different levels of each kit available. Often you can buy just a body and source all the other parts yourself, such as the brakes, seats, wheels and tires. There are also kit cars that the factories will in fact build for you! There are even some that will let you help them build your car!

Here is a site with a very long list of kit car manufacturers if you are looking for something different. There is a car for everyone!

As always, please share this article and Like us on Facebook

So has this gotten your creative juices flowing? Are you rip roaring ready to get down in the garage and build your own car? Or would you rather buy a production car? Have you ever seen a kit car on the street or at a car show?

7. My Wheel Life – How To: Why to install headers AND how to repaint rusted headers

A rat rod with long tube headers.

A rat rod with long tube headers.


Quartermile:
Headers let your engine breath better, thus increasing performance, speed, acceleration and fun factor!
Use rubber gloves when using paint to avoid paint on your hands and to avoid getting your hand oils on the headers after you have cleaned them, before painting.
Header wrap or High temp paint, or both can be used to protect headers.

The Full Monty
First, if you are newer to engines and modifying them, or if you are an old hand even, you should watch this video and hopefully you can get an idea of the basics of how an engine works. https://www.youtube.com/watch?v=60QX5RY_ohQ

This Model T Ford is a mixture of Gasser and Rat Rod. It's mostly for fun, and not so much for actual performance. This engine has a straight pipe for each cylinder. They are actually about the best you can get for flow, unless you start dabbling in tuned length runners, etc. It's really an independent header for each cylinder.  I think it's awesome!

This Model T Ford is a mixture of Gasser and Rat Rod. It’s mostly for fun, and not so much for actual performance. This engine has a straight pipe for each cylinder. They are actually about the best you can get for flow, unless you start dabbling in tuned length runners, etc. It’s really an independent header for each cylinder. I think it’s awesome!

If you are reading this you just might be interested in making the engine perform better in your vehicle of choice. I will use the old old old old analogy, “The engine is an air pump.” If you can get more air (and a corresponding amount of fuel) into the combustion chamber, and ignited, you will make more power and go faster. An important part of the airflow of the engine is the exhaust. This removes the used A/F (air/fuel) mixture out of your combustion chamber and gets it ready for a new mixture. Efficiently removing this air allows more new mixture in, thus making more horsepower.

There are many parts to your exhaust. After the valve and the exhaust port, the exhaust manifolds are the first part of the exhaust making up the system of pipes that lead the exhaust to the back of your car. Usually the factory exhaust manifolds are heavy and ugly. Thus, replacing them with headers is both an appearance upgrade, a weight saving (performance) and makes your engine develop more horsepower (performance x2!).Headers are a popular first or second upgrade for any engine. The best analogy I can give is a water hose. The manifolds would represent squeezing the hose right at the end closest to the water source, if you let that expand, you flow more water. This is in essence what headers do. You see why headers are so great!

These are exhaust manifolds. They do the same job as headers, but they don't flow as good or make as much horsepower and often weight more because they are cast iron instead of steel tubes, which are thinner. Although headers could weight more because they are longer but they they make more horsepower.

These are exhaust manifolds. They do the same job as headers, but they don’t flow as good or make as much horsepower and often weight more because they are cast iron instead of steel tubes, which are thinner. Although headers could weight more because they are longer but they they make more horsepower.


There are a myriad of types of headers and I don’t have the space to write about all of them but I will give you the long and short of it, literally! The two most basic types of headers are called “Long Tube” and “Short Tube” headers. Gearheads like to keep it simple, so the names mean exactly what it sounds like, the physical tubes making up a long tube header are longer. See picture. Long tube headers generally make more peak horsepower, good for racing but they take up more underhood room as they are physically larger. Short tube headers generally are good for a street car because they are easier to install (smaller, less interference with other parts of the car) and they have good lower end torque (idle to ½ throttle) where you are typically driving a street car.

short tube headers

short tube headers


Long tube headers

Long tube headers

There are various ways to protect your headers from the elements. The easiest would be to buy stainless steel headers. They don’t rust since they have a high chromium content (>10.5% by mass). Another expensive solution is to have the headers chrome plated. These are very attractive but also expensive. A third solution is to apply your own high temp paint which I will chronicle my experience with below. This is definitely the most “cost effective” method, approximately $50 in materials, max.
One more way to protect your headers is to wrap them. When wrapping headers I would still recommend painting them. The header wrap could actually absorb water and hold it on the headers. Header wrap also will keep your under hood temperatures down and greatly reduce the risk of burning yourself. They are popular on motorcycles and race cars.

This is a Model A Ford Sedan with header wrap. It's barely visible behind the front tire, but it was the best picture I had, and again, sweet car. Picture is justified in my blog!

This is a Model A Ford Sedan with header wrap. It’s barely visible behind the front tire, but it was the best picture I had, and again, sweet car. Picture is justified in my blog!


How to paint headers:
If you read about My Monte in post #2 https://mywheellife.com/2014/05/20/my-wheel-life-my-monte/
you would have noticed that headers were the first performance upgrade I did. That was 5 years ago and they have become rusty despite the anti-rust coating applied to them by the manufacturer when I bought them. I recently had some starter issues with that car and had to take the headers off to get the starter off. I took that opportunity to re-rustproof the headers. Since headers are the hottest exposed part of the engine they need special paint or coating to protect them from rust, normal paint will burn off.

The first thing you need to do is to remove the rust off the headers. They need to be stripped to bare metal. I used a wire wheel and a 3M varnish/paint remover pad, both mounted on a ½” drill. This worked a lot better, faster, easier than using sand paper. There are a few other ways you could remove the rust and paint. You could use an acid paint/rust stripper. I have never done this but that stuff is definitely abrasive to the hands. You definitely want to use rubber gloves when using that. I have heard it does a very good job cleaning them though. Another way would be a sand blaster, but I believe the drill works fastest and easiest in this case and with the least exposure to chemicals! It took approximately 30 minutes – 1 hour per header.

Headers as they started in the car. Rusty, ugly. Eventually they could have rusted through and I could have had an exhaust leak. That's not good!

Headers as they started in the car. Rusty, ugly. Eventually they could have rusted through and I could have had an exhaust leak. That’s not good!


Passenger side. Rusty headers. These have been in the car since 2008 so they were possibly due to be recoated.

Passenger side. Rusty headers. These have been in the car since 2008 so they were possibly due to be recoated.

http://www.amazon.com/3M-Scotch-Brite-Varnish-Remover-9414NA/dp/B000BQWPAQ

drill and wire wheels used to remove rust

drill and wire wheels used to remove rust

After the headers are cleaned of paint and rust to bare metal they need to have any grease removed before they can be painted. Carb cleaner, paint thinner or acetone are good cleaners for grease. There are also specific grease removers for this. I used carb cleaner and and a new clean shop rag. After that, you can prime the bare metal headers. VHT sells a primer specifically for use with their paint. VHT Flame Proof is the specific brand they use for 1200-2000 degrees F. This is header specific coating. They also have lower temp paints for engine blocks and brake calipers or drums. I followed the directions on the can to apply 2 light coats 10 minutes apart and a medium coat. This makes it so all coats are tacky and you don’t have to sand in between them. Holding anything when painting it is difficult. I hung the parts from a nail on the wall, as seen in the picture. Wire from a rafter or cherry picker (engine lift) works also. Make sure to not get overspray on anything when painting! After the primer stage let dry for 24 hours at least. I lightly sanded the headers with 200 grit sandpaper then sprayed 3 coats of VHT Flame Proof paint. The VHT website is a bit confusing as they say there is not VHT Flame Proof primer, but the can specifically says use a VHT Flameproof primer, and I was able to buy VHT Flame Proof primer. The name primer was only on the bar code. It’s not on the label anywhere else. I’ll have to get in touch with VHT on this. Anyway, after VHT Flame Proof paint is applied, it needs to be cured. First it has to dry for at least 24 hours. After that it needs to be headed to cure. This can be done in an oven or on the engine with light running, letting the headers cool, and later a harder run to get them hotter.
http://www.speco.com.au/vht_faq.html

Headers hanging on the wall being painted. 3 coats seemed to be about right. I also had 2 coats of VHT primer.

Headers hanging on the wall being painted. 3 coats seemed to be about right. I also had 2 coats of VHT primer.


Headers after they have been cleaned and repainted, and re-installed. Don't they look so much nicer? Also they should not rust away for some time! Disregard the dirty charcoal canister, radiator, inner fender wells and valve covers.

Headers after they have been cleaned and repainted, and re-installed. Don’t they look so much nicer? Also they should not rust away for some time! Disregard the dirty charcoal canister, radiator, inner fender wells and valve covers.


Well, hopefully you’ve learned a few things about headers in this article, and why you should buy them for your car, immediately.
Do you have a car with headers?
What was the first performance upgrade you did to your car if it wasn’t headers?
Keep the rubber side down! (Don’t forget to follow my blog (upper right, just type in your email and be sure to confirm once you get an email) so you don’t miss a new post!)
Also if you enjoy this, please share with your friends, on Facebook or in person even!

4. My Wheel Life – Tech:The art of the oil change

Disclaimer! Changing your oil can be dangerous! You will lift a heavy vehicle off the ground and be under it. Please observe all precautions when changing your oil. I am not liable for any injuries received from people misusing the information contained in this post.

The Quartermile: What you need to know
Ramps are much easier and safer for raising your car than a jack and jack stands. (block behind rear wheels)
A filter wrench is the correct tool for removing an oil filter. Install new filter ¼-½ turn after tight, by hand.
A drain pan with a spout is much cleaner than an open drain pan.
It’s best to have a friend who’s knowledgeable about cars help you the first time you attempt to change your oil if you never have before. Don’t ruin your car! If you are unsure, ask.
Emails can be sent to hooglandaxel@gmail.com or the comment section below.

By this time, if you’ve been reading, along you’ve attended a few events hopefully and hopefully bought a new vehicle (or you would have had I released these posts in the order I originally wrote them. On that note look for a future “How to buy a car” post). Now it’s time to make sure your new car is ready to go. One way to get intimate with your car is an oil change. Hopefully you referred to my last post and when you bought your new car you asked the seller when the last oil change was, then you should be aware if you car is due. Even if it’s not due yet, it will definitely need an oil change sooner or later. (If I had released that post yet)

The oil change is one of the best ways to get to know your car. It is also one of the easiest ways to work on your car and feel like you’ve really accomplished something.

Like any work, I find it easiest to handle the oil change in two stages.
Stage 1: Gather all supplies
Stage 2: Actually change the oil

You will need a good list of things to change your car’s oil. Some are nice and some are necessary. Oil is necessary, ramps are nice but not necessary.
Necessary:
New Oil (refer to your car manual for the weight of oil, ex 10w-40, conventional or synthetic)
New Filter
a way to lift the car off the ground (Lift, ramps, jack stands/jack/wheels)
socket to remove drain pan plug (Make sure it’s the right size!)
Oil filter wrench (this is not actually necessary but it’s definitely the best way to remove the filter, actually no it’s necessary)
drain pan

Really really nice to have:
clean rags
Ramps

First you will need to get your vehicle in the air. I have been making due with using my wheel changing scissor jack and jack stands. This is a much more difficult and time consuming way to do this. The nicest way, in your parking lot, is to use ramps. They are fast and relatively inexpensive. If you do use a jack the safest way to secure the car in the air is to put another set of tires under the car’s front tires. It’s nearly impossible for the car to fall off a tire. If you don’t have tires, jack stands are also very good. You should also have your park brake on, the vehicle in park and a block behind your rear tires, all to prevent the vehicle rolling away. Safety First!

Now you are ready to drain the oil . Make sure to have an oil drain pan under the drain plug and offset in the direction that the oil will shoot out. Here is a good place to mention the benefits of a drain pan that is enclosed and has a spout to help you pour out the oil.

Drain pain with spout

Drain pain with spout


This is a great benefit over a simple open pan. When pouring from these pans you will, without a doubt, get oil all over the ground, your feet, and whatever you are pouring into. To Loosen the drain plug, first make sure you have the correct size socket/wrench. Turn counterclockwise to loosen the nut. Turn it a few turns and then it will be best to finish removing it by hand. You will want to turn the plug counterclockwise but keep pushing it into the pan, sealing as much oil in as you can until it is completely unthreaded. Once the plug is completely unthreaded, pull it away fast and get as little oil on your hand as possible, this is quite the feat.
Stripped oil drain pan bolt (from a friend, not me!)

Stripped oil drain pan bolt (from a friend, not me!)

Next you will want to remove the oil filter. There are 2 main types of filters. Historically most vehicles used external filters, and these are still very common. More recently there are cartridge filters. These are often easier to change and less messy. For external filters, there are multiple wrong ways to go about removing this part. It is possible to use a large channel locks to grab the filter. You can also stab a screwdriver through the filter and turn using that. Both of these methods will ultimately cause you more trouble than good. You will likely puncture the filter and make a big mess with oil everywhere and expose yourself to sharp surfaces on the filter. The correct way to remove the filter is using a filter wrench. Some filters have a large socket built into the bottom of the filter. These can be good, but personally I have always had good luck with the strap style filter wrench.

Filter wrench

Filter wrench


Filters also come in different sizes, so when buying a filter wrench make sure it fits your filter! Make sure you have a drain pan under the oil filter to catch oil. You will want to turn the filter a few times counter clock wise to get it loose. Then, like the drain plug, spin until loose while pushing up and once it is loose control the filters fall to the drain pan.

Now to install the new filter. First you will want to let all the oil drain out. I like to wipe off the seating surface on the engine block with a clean rag. You will want to smear some of the new oil on the sealing ring (on the filter) to ensure a good seal. Then spin the filter back on until snug, then turn between ¼ and ½ a turn, by hand. This is all the tighter the filter needs to be reinstalled. It should be snug but not so tight it is squeezing the seal out, creating a leak. This is one area where changing your own oil is good. Often a shop will over tighten the filter to where it’s nearly impossible to remove! This is to cover themselves as it’s better, for them,if it doesn’t come off than if it falls off. Same goes for the drain pan plug for that matter.
By now all of the oil should have drained out of your car. You can remove the oil and put the drain pan plug back in. Make sure to wipe all the oil off the pan. Start threading the plug back in BY HAND. In fact this is a good place to mention that all nut/bolts should always be started by hand and tightened as much as possible this way to avoid cross threading. There should be a torque spec for the pan plug. Often to snug and then ¼ to ½ is good. As you work on your car more you will definitely develop a feel for tightening nuts eventually and for most general nuts/bolts you should develop a “calibrated” hand so you shouldn’t need a torque wrench unless it’s an important vehicle part, like a head on the engine. You definitely don’t want to over tighten this bolt as you will strip the thread which will lead to an oil pan change. If you are at a level where you are tempted to tighten the pan plug til you are stripping the threads, you probably aren’t ready to perform an oil pan replacement. It’s probably best to practice tightening a bolt in a nut held in in a vise if you have never tightened a bolt in your life.
After you have put the filter and plug back in you are ready to fill the vehicle with nice new oil. I always use a small funnel to direct the oil back into the engine and not get it all over the engine!

funnel to fill crankcase

funnel to fill crankcase


Refer to your owners manual for the right amount of oil for your vehicle. After you have filled it and looked that there are no leaks I prefer to put the car back on the ground. I then start the car and let it run a minute or two. This gets the oil filter filled and the oil level correct. Let the vehicle sit a few minutes while you clean up. You can then check the oil level.
An important thing to do after changing your oil is to make a log of when you changed it so you know when to change it again, this gets especially important when you have multiple vehicles. I personally use duct tape and a magic marker and place it over the old reminder. I also like to put the date on so I remember that. I prefer to mark the mileage when I changed the oil, as opposed to most stops put when the next change is due. I tend to go over the recommended 3,000 miles (for older cars). Some new cars can go to 15,000+. I prefer to know how many miles I have on the oil as opposed to when it “should” be changed. They intervals are different for every vehicle and engine so do your homework, check your owners manual, ask your friends, or ask me in the comments below.
I personally keep an excel document of all the work I do to each vehicle (since I have 6 vehicles), each gets it’s own page. Mileage done at, date, and maintence done. I find this the best way to know what needs to be done next.
Lastly you will need to dispose of your old oil. Remember the drain pan with a spout? This is where it will help you in putting the old oil back into the quart/5 quart bottles the new oil came in. Once you have poured the old oil in, make sure to mark the bottle on the top “Bad/used oil”. You will not likely be returning it that day to the disposal place.
Label bad oil!

Label bad oil!


It may sound impossible that someone would mistake this old oil for good new oil, but stranger things have definitely happened! Better safe than sorry. Lastly you will need to dispose of your old oil and filter. Usually you should be able to return that to any place that sells oil free of charge.

Hopefully this post has gotten you excited about working on your car. In the future I will investigate some more exciting work. But I think changing your oil is a definitely a good place to start for those who haven’t gotten their hands too dirty yet.

Ready to go!

Ready to go!